Menus and Toolbars
Menubar
A menubar is one of the most visible parts of the GUI application. It is a group of commands located in various menus. While in console applications you had to remember all those arcane commands, here we have most of the commands grouped into logical parts. There are accepted standards that further reduce the amount of time spending to learn a new application. To implement a menubar in wxWidgets we need to have three things. A wxMenuBar, a wxMenu and a wxMenuItem.

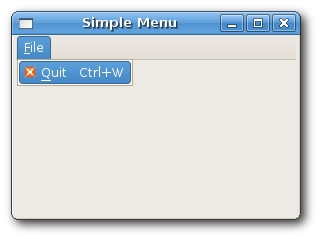
Simple menu example
Creating a menubar in wxWidgets is very simple. Just a few lines of code.
menu.bmx <- Open sourceSuperStrict Framework wx.wxApp Import wx.wxFrame New MyApp.Run() Type MyApp Extends wxApp Method OnInit:Int() Local sim:SimpleMenu = SimpleMenu(New SimpleMenu.Create(Null, .. wxID_ANY, "Simple Menu", -1, -1, 280, 180)) sim.Show(True) Return True End Method End Type Type SimpleMenu Extends wxFrame Field menubar:wxMenuBar Field file:wxMenu Method OnInit() menubar = New wxMenuBar.Create() file = New wxMenu.Create() file.Append(wxID_CLOSE, "&Quit") menubar.Append(file, "&File") SetMenuBar(menubar) Connect(wxID_CLOSE, wxEVT_COMMAND_MENU_SELECTED, OnQuit) Centre() End Method Function OnQuit(event:wxEvent) wxWindow(event.parent).Close(True) End Function End Type
menubar = New wxMenuBar.Create()
First we create a menubar object.
file = New wxMenu.Create()
Next we create a menu object.
file.Append(wxID_CLOSE, "&Quit")
We append a menu item into the menu object. The first parameter is the id of the menu item. The second parameter is the name of the menu item. Here we did not create a wxMenuItem explicitely. It was created by the Append() method behind the scenes. Later on, we will create a wxMenuItem manually.
  menubar.Append(file, "&File")
  SetMenuBar(menubar)
After that, we append a menu into the menubar. The & character creates an accelerator key. The character that follows the & is underlined. This way the menu is accessible via the alt + F shortcut. In the end, we call the SetMenuBar() method. This method belongs to the wxFrame widget. It sets up the menubar.
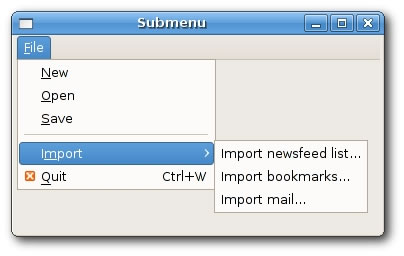
Submenus
Each menu can also have a submenu. This way we can group similar commnads into groups. For example we can place commands that hide/show various toolbars like personal bar, address bar, status bar or navigation bar into a submenu called toolbars. Within a menu, we can seperate commands with a separator. It is a simple line. It is common practice to separate commands like new, open, save from commands like print, print preview with a single separator. In our example we will see, how we can create submenus and menu separators.
SuperStrict Framework wx.wxApp Import wx.wxFrame New MyApp.Run() Type MyApp Extends wxApp Method OnInit:Int() Local sub:SubMenu = SubMenu(New SubMenu.Create(Null, .. wxID_ANY, "Submenu", -1, -1, 280, 180)) sub.Show(True) Return True End Method End Type Type SubMenu Extends wxFrame Field menubar:wxMenuBar Field file:wxMenu Field imp:wxMenu Field quit:wxMenuItem Method OnInit() menubar = New wxMenuBar.Create() file = New wxMenu.Create() file.Append(wxID_CLOSE, "&Quit") file.Append(wxID_ANY, "&New") file.Append(wxID_ANY, "&Open") file.Append(wxID_ANY, "&Save") file.AppendSeparator(); imp = New wxMenu.Create() imp.Append(wxID_ANY, "Import newsfeed list...") imp.Append(wxID_ANY, "Import bookmarks...") imp.Append(wxID_ANY, "Import mail...") file.AppendSubMenu(imp, "I&mport") quit = New wxMenuItem.Create(file, wxID_CLOSE, "&Quit~tCtrl+W") file.AppendItem(quit) menubar.Append(file, "&File") SetMenuBar(menubar) Connect(wxID_CLOSE, wxEVT_COMMAND_MENU_SELECTED, OnQuit) Centre() End Method Function OnQuit(event:wxEvent) wxWindow(event.parent).Close(True) End Function End Type
We created one submenu in a file menu. It is an import submenu, which can be seen in Opera web browser.
file.AppendSeparator()
A menu separator line is created calling an AppendSeparator() method.
 imp = New wxMenu.Create
 imp.Append(wxID_ANY, "Import newsfeed list...")
 imp.Append(wxID_ANY, "Import bookmarks...")
 imp.Append(wxID_ANY, "Import mail...")

 file.AppendSubMenu(imp, "I&mport")
A submenu is created like a normal menu. It is appended with a AppendSubMenu() method.
Toolbars
Menus group all commands that we can use in an application. Toolbars provide a quick access to the most frequently used commands.
 virtual wxToolBar* CreateToolBar(long style = wxNO_BORDER | wxTB_HORIZONTAL,
              wxWindowID id = -1, const wxString& name = "toolBar")
To create a toolbar, we call the CreateToolBar() method of the frame widget.
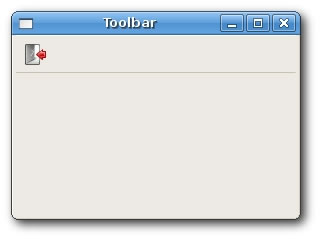
A simple toolbar
Our first example will create a simple toolbar.
SuperStrict Framework wx.wxApp Import wx.wxFrame New MyApp.Run() Type MyApp Extends wxApp Method OnInit:Int() Local tb:Toolbar = Toolbar(New Toolbar.Create(Null, wxID_ANY, .. "Toolbar", -1, -1, 280, 180)) tb.Show(True) Return True End Method End Type Type Toolbar Extends wxFrame Method OnInit() wxImage.AddHandler( New wxPNGHandler ) Local bmpExit:wxBitmap = New wxBitmap.CreateFromFile(.. "../media/exit.png", wxBITMAP_TYPE_PNG) Local tbar:wxToolBar = CreateToolBar() tbar.AddTool(wxID_CLOSE, "Exit application", bmpExit) tbar.Realize() Connect(wxID_CLOSE, wxEVT_COMMAND_TOOL_CLICKED, OnQuit) Centre() End Method Function OnQuit(event:wxEvent) wxWindow(event.parent).Close(True) End Function End Type
In our example, we create a toolbar and one tool button. Clicking on the toolbar button will terminate the application.
Local toolbar:wxToolBar = CreateToolBar()
We create a toolbar.
toolbar.AddTool(wxID_CLOSE, "Exit application", bmpExit)
We add a tool to the toolbar.
toolbar.Realize()
After we have added the tools, we call the Realize() method.
Toolbars
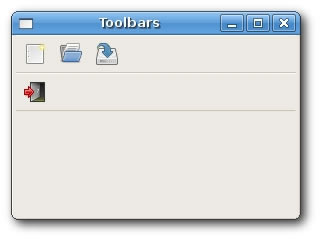
If we want to have more than one toolbar, we must create them in a different way. e.g. other than calling the CreateToolbar() method.
SuperStrict Framework wx.wxApp Import wx.wxFrame New MyApp.Run() Type MyApp Extends wxApp Method OnInit:Int() Local tb:Toolbars = Toolbars(New Toolbars.Create(Null, wxID_ANY, .. "Toolbars", -1, -1, 280, 180)) tb.Show(True) Return True End Method End Type Type Toolbars Extends wxFrame Field toolbar1:wxToolBar Field toolbar2:wxToolBar Method OnInit() wxImage.AddHandler( New wxPNGHandler ) Local bmpExit:wxBitmap = New wxBitmap.CreateFromFile(.. "../media/exit.png", wxBITMAP_TYPE_PNG) Local bmpNew:wxBitmap = New wxBitmap.CreateFromFile(.. "../media/new.png", wxBITMAP_TYPE_PNG) Local bmpOpen:wxBitmap = New wxBitmap.CreateFromFile(.. "../media/open.png", wxBITMAP_TYPE_PNG) Local bmpSave:wxBitmap = New wxBitmap.CreateFromFile(.. "../media/save.png", wxBITMAP_TYPE_PNG) Local vbox:wxBoxSizer = New wxBoxSizer.Create(wxVERTICAL) toolbar1 = New wxToolBar.Create(Self, wxID_ANY) toolbar1.AddTool(wxID_ANY, "", bmpNew) toolbar1.AddTool(wxID_ANY, "", bmpOpen) toolbar1.AddTool(wxID_ANY, "", bmpSave) toolbar1.Realize(); toolbar2 = New wxToolBar.Create(Self, wxID_ANY) toolbar2.AddTool(wxID_CLOSE, "Exit application", bmpExit) toolbar2.Realize() vbox.Add(toolbar1, 0, wxEXPAND) vbox.Add(toolbar2, 0, wxEXPAND) SetSizer(vbox); Connect(wxID_CLOSE, wxEVT_COMMAND_TOOL_CLICKED, OnQuit) Centre() End Method Function OnQuit(event:wxEvent) wxWindow(event.parent).Close(True) End Function End Type
In our example, we create two horizontal toolbars. We place them in a vertical box sizer.
 toolbar1 = New wxToolBar.Create(Self, wxID_ANY)
 ...
 toolbar2 = New wxToolBar.Create(Self, wxID_ANY)
Here we create two toolbars.
  vbox.Add(toolbar1, 0, wxEXPAND)
  vbox.Add(toolbar2, 0, wxEXPAND)
And here we add them to the vertical box sizer.